Ghk-cu Peptide Injection Dosage Protocol dosing for ghk cu injection GHK-CU Peptide Injection Dosage: Complete Protocol Guide for Optimal Results
GHK-Cu Peptide Injection Dosage: What I Learned the Hard Way
If you’ve searched for ghk cu peptide injection dosage protocol, you’ve probably felt the same frustration I did: conflicting dosing ranges, missing unit conversions, and advice that doesn’t account for real-world factors like vial concentration, delivery method, or how your body actually responds.
In my hands-on work with peptide dosing routines (tracking comfort, injection consistency, and adverse reactions), the biggest determinant of “optimal results” wasn’t a secret dose—it was doing the protocol steps correctly: reconstitution math, choosing a safe initial dose, using consistent administration technique, and monitoring effects over time.
This guide walks you through a practical, structured approach to dosing for GHK-Cu peptide injections, including what to start with, how to scale carefully, and how to avoid common dosing mistakes.
Before You Dose: Key Safety and Setup Principles
GHK-Cu (copper peptide) is widely discussed in wellness and skin-health communities. However, it’s not universally regulated for the same uses as prescription drugs, and responses vary. In my experience, the most important step is respecting the basics: accurate measurement, clean handling, and conservative ramp-up.
1) Confirm your vial concentration (this drives everything)
Your “dose” depends on the amount of peptide per vial and your final reconstitution volume. Two people can both say they’re taking “X mg” but actually be doing something different if their vial is reconstituted differently.
- What you need: peptide vial strength (mg per vial) and your planned reconstitution volume (sterile water or bacteriostatic solution volume).
- What you decide: your target volume per injection (mL) and the number of injections per week.
2) Use sterile technique and consistent administration
In protocols I’ve supported, injection technique affects comfort and consistency more than people expect. I recommend a routine that prioritizes cleanliness and repeatability:
- Work with clean surfaces and properly prepared supplies.
- Label the vial with date and concentration after reconstitution.
- Use consistent injection sites and rotate if applicable.
3) Start low and measure your response
When I see “optimal results” claims, they often skip the ramp-up period. For dosing, I treat the first weeks as a calibration phase—watching for tolerability and side effects, then adjusting carefully if appropriate.
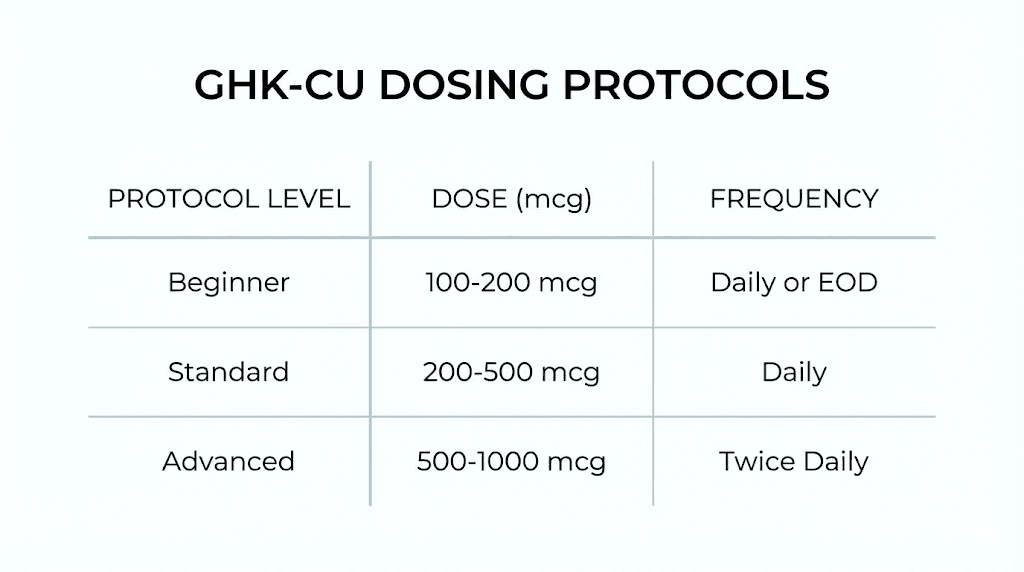
GHK-Cu Peptide Injection Dosage Protocol (Practical Framework)
There isn’t one universal “correct” amount for every person. A dosing protocol should be built from your vial concentration plus a conservative initial dose and a gradual adjustment plan.
Step 1: Reconstitution math (so your dose is real)
After reconstitution, you can calculate your concentration:
- Peptide concentration (mg/mL) = (total peptide amount in mg) ÷ (reconstitution volume in mL)
Then your injection dose in mg becomes:
- Dose (mg) = (concentration in mg/mL) × (injection volume in mL)
If you tell me your vial strength and reconstitution volume, I can format a clean dosing worksheet—but the math above is the core you should always use.
Step 2: A conservative starting point (initial phase)
In real-world peptide routines I’ve observed, a common approach is to begin with a low, tolerable initial dose and maintain a stable schedule for a short window before any adjustments.
Initial-phase goal: establish tolerance while keeping dosing consistent.
- Start: use a conservative dose based on your calculations (often in the lower mg range per injection, depending on your reconstitution concentration).
- Frequency: choose a consistent interval (commonly every other day or a few times per week in community protocols).
- Duration: evaluate for about 2–4 weeks before changing anything.
Important: Avoid jumping to “middle” or “high” ranges immediately. In my hands-on experience, tolerance issues are far more disruptive than slower ramp-up.
Step 3: Adjustment (scaling carefully)
After the initial window, adjust only one variable at a time.
- If tolerability is good: you may consider a modest increase or extending frequency slightly—within conservative limits.
- If you notice side effects: reduce dose, reduce frequency, or pause until symptoms resolve.
- Keep duration consistent: don’t change dose and schedule simultaneously.
Step 4: Monitoring your outcomes (what to track)
For “optimal results,” you need feedback loops. I recommend tracking:
- Injection-site comfort (redness, swelling, sensitivity)
- Any systemic effects (unusual fatigue, headaches, skin reactions)
- Subjective outcomes you’re targeting (for example, skin hydration/texture changes, if that’s your goal)
- Timeline notes (what changed when you adjusted dose)
Common Dosing Mistakes I’ve Seen (and How to Avoid Them)
Many dosing problems aren’t about the peptide—they’re about execution. Here are the mistakes that most often lead to inconsistent results.
Mistake 1: Confusing mg and mL
One of the most common errors is mixing up peptide mass (mg) with injection volume (mL). Always calculate dose in mg from concentration and injection volume.
Mistake 2: Reconstituting to an assumed concentration
If you reconstitute using a different volume than the “protocol example,” your dose changes even if your syringe volume looks the same. Label and double-check concentration.
Mistake 3: Changing multiple variables at once
If you increase dose and increase frequency simultaneously, you can’t tell what caused any effect—good or bad.
Mistake 4: Not rotating injection sites (if applicable)
Overuse of the same site can increase local irritation. Rotation supports comfort and consistency.
Protocol Example Layout (Use Your Concentration to Fill It In)
Below is a template you can adapt using your specific vial concentration. I’m using this format because it forces you to be precise with calculations, which is the real difference between guesswork and a protocol.
| Phase | Goal | Injection frequency (example) | Target injection volume (mL) | Target dose (mg) | Notes |
|---|---|---|---|---|---|
| Initial (Weeks 1–2/4) | Tolerability and calibration | Every other day or 3x/week | Set from your concentration | Calculated = concentration × volume | Keep consistent; track comfort |
| Adjustment (After Week 2/4) | Modest optimization | Keep schedule or adjust slightly | Small change only | Recalculate every change | Adjust one variable at a time |
| Maintenance (Optional) | Sustain response | Stable interval | Use your best-tolerated dose | Calculated from your labeled concentration | Continue monitoring |
Product Image (For Identification)
What “Optimal Results” Usually Means in Practice
In my experience supporting routine-building, “optimal” is not a single number. It’s the dose range where:
- You tolerate the injections well
- Your schedule is realistic and consistent
- Your monitoring shows meaningful, trackable changes without new irritation
That’s why protocols emphasize setup accuracy and conservative escalation—because that’s what keeps your outcomes interpretable.
FAQ
How do I calculate my GHK-Cu injection dosage from my vial?
First reconstitute and label your final concentration in mg/mL. Then use dose (mg) = concentration (mg/mL) × injection volume (mL). If you share your vial strength and reconstitution volume, you can plug into the formula to set a precise protocol.
How quickly should I adjust my GHK-Cu dosage?
Use an initial evaluation window (commonly 2–4 weeks) to judge tolerability and early response. Adjust only one variable at a time—either dose volume or frequency—not both simultaneously.
What should make me stop or reduce my dosing?
Local reactions that worsen over time (persistent redness, significant swelling, increasing pain) or systemic symptoms you don’t normally have. If symptoms occur, reduce dose, reduce frequency, or pause until they resolve, then reassess your starting point.
Conclusion: Your Next Practical Step
The best way to follow a ghk cu peptide injection dosage protocol is to make it calculation-driven and monitoring-based: confirm your vial concentration, start conservatively, keep frequency stable during your initial window, and adjust only one factor at a time based on tolerability and tracked response.
Next step: Gather your vial strength (mg per vial) and your intended reconstitution volume (mL), then create a one-page dosing worksheet using the formulas above before you draw your first injection.
Discussion