How To Give Im B12 Injection B12 vitamin Store How to Give an Intramuscular Injection of Vitamin B12
If you’ve ever tried to help a family member or follow a clinic plan at home, you know the real challenge isn’t understanding vitamin B12—it’s how to give im b12 injection safely and consistently. In my hands-on work supporting patients who needed B12 IM injections (often with tight schedules, limited mobility, or anxiety around needles), the difference between “it’s fine” and “it went well” came down to preparation, technique, and patient comfort details that most guides skip. This article walks you through the practical steps, what to watch for, and how to reduce common injection mistakes.
Note: Always follow your prescriber’s instructions for dose, frequency, and the specific product you’re using. If you’re unsure about any step, ask a clinician for a live demonstration before doing it at home.
What an Intramuscular (IM) Vitamin B12 Injection Really Means
An IM injection delivers medicine into muscle tissue so it can absorb predictably. Vitamin B12 is commonly prescribed as an IM injection when oral forms aren’t sufficient or when faster correction is needed based on the care plan.
In my experience, people underestimate how much “muscle targeting” matters. If the injection ends up too shallow (subcutaneous rather than intramuscular) or in the wrong spot, patients may feel more pain, and absorption can be less reliable. The goal is to deposit the medication into the muscle belly using the correct needle length, angle, and site selection.
Common IM injection sites for B12
Most IM B12 injections are given into one of these areas:
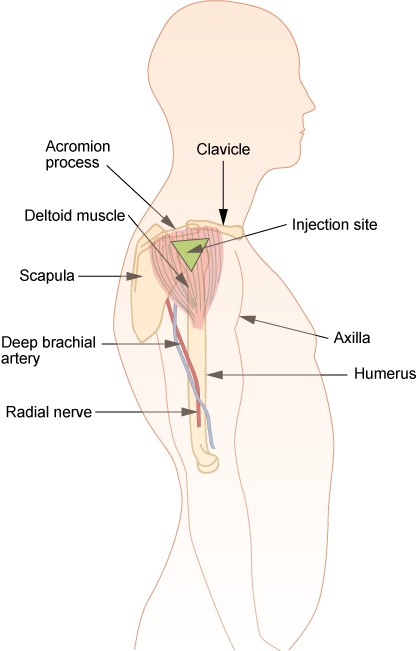
- Deltoid (upper arm): Often used for smaller volumes and when instructed.
- Ventrogluteal (hip area): Commonly preferred for many adults because it’s away from major nerves and blood vessels (when you know the landmark technique).
- Vastus lateralis (outer thigh): Another option, especially if self-injection is needed and technique is well taught.
The injection site should match what your clinician instructed for your specific case.
Before You Inject: Set Up for Safety and Comfort
When patients ask me how to give IM B12 injections at home, I first focus on setup. In real-world use, good technique is difficult when supplies are scattered, lighting is poor, or the patient is tense. A calm environment improves cooperation and reduces muscle guarding (which can make injections more painful).
Supplies to have ready
- Prescribed vitamin B12 medication and the correct needle/syringe components
- Alcohol swabs or appropriate antiseptic prep pads
- Clean gauze or cotton balls
- Sharps disposal container
- Gloves if recommended or if it helps reduce anxiety
- A timer or checklist (seriously—consistency matters)
Room and patient preparation
- Wash hands thoroughly and dry them.
- Use good lighting so you can clearly locate landmarks.
- Position the patient so the target muscle is relaxed (tensing the arm or thigh makes it harder and more painful).
- Inspect the medication: check the label and expiration date; don’t use if it appears compromised per your product guidance.
Needle and medication checks (to avoid avoidable problems)
In my hands-on experience, the most common “technical” issues aren’t dramatic—they’re small mismatches: the wrong needle size, forgetting to confirm the correct dose, or rushing through the medication preparation. Take a moment to confirm:
- You have the exact dose your prescriber ordered.
- You’re using the needle length and gauge provided in your injection instructions.
- The medication is prepared correctly (for example, mixing or drawing up according to the product instructions).
Step-by-Step: How to Give IM B12 Injection
Below is a practical, safety-first walkthrough for intramuscular injection technique. Because exact steps can differ by patient, product presentation (vial vs. prefilled), and site choice, treat this as a technique framework to align with your clinician’s directions.
Step 1: Choose and mark the correct injection site
Use the landmarks your clinician taught you. If you’re using the deltoid, you’ll typically aim for the outer upper arm area—never the shoulder joint itself.
Key point: Avoid injecting into areas that are bruised, swollen, infected, or very tender.
Step 2: Clean the skin
Wipe the injection site with an alcohol swab using firm friction. Let it air-dry.
- Don’t blow on the area after cleaning.
- If you touch the cleaned skin afterward, re-clean before injecting.
Step 3: Position for muscle relaxation
Ask the patient to relax the muscle. In the deltoid, I often see people inadvertently tense their shoulder—especially when they’re anxious. When the shoulder is relaxed, the injection tends to feel less intense.
Step 4: Insert the needle correctly
For IM injections, the needle is typically inserted at an angle appropriate to the needle length and site instruction (commonly around 90 degrees for many IM techniques). Insert smoothly and with controlled confidence.
What I’ve learned: Hesitation and “hovering” tends to increase discomfort and cause more movement. Once you’re lined up, commit to the motion.
Step 5: Administer the B12 medication
Inject the medication at a steady pace. Very fast injection can increase pain, and very slow injection can be difficult if the patient is uncomfortable—steady is usually best.
Step 6: Withdraw and protect the site
Remove the needle using a steady motion. Apply gentle pressure with gauze if needed.
- Don’t rub aggressively—gentle pressure is usually sufficient.
- Use a sharps container immediately after disposal. Never recap needles unless your clinician’s instructions specifically require it and you can do so safely.
Step 7: Document and monitor
For repeat injections, tracking matters. I recommend noting:
- Date and time
- Site used (e.g., left deltoid vs right deltoid)
- Dose administered
- Any unusual reaction (significant bleeding, persistent severe pain, etc.)
Rotate sites as instructed to reduce irritation.
Common Mistakes and How to Avoid Them
Most problems come from predictable causes. Here are the issues I most often see during training and follow-up questions.
1) Wrong site or poor landmarking
If you can’t clearly find the landmark, stop and get guidance. I’ve found that “good enough” site selection can lead to extra pain or inadequate technique. Landmarks exist for a reason.
2) Injecting too shallow or too deep
Needle length and muscle depth matter. Using a needle length that doesn’t match the site instruction can change whether the medication truly goes intramuscular.
3) Rushing the prep
Skipping skin prep, not letting alcohol dry, or not confirming dose can undermine both safety and comfort.
4) Not rotating sites
Repeated injections into the same spot can cause localized soreness and inflammation, making future injections feel worse.
5) Ignoring patient reactions
Mild soreness is common, but severe or worsening symptoms aren’t. If reactions are more than expected, contact your clinician.
What to Expect After a B12 IM Injection
After an IM injection, it’s typical to have:
- Short-term soreness or tenderness at the injection site
- Mild redness
- Occasional minor bruising
In contrast, seek medical advice promptly if you notice signs of a more serious reaction or complication, such as:
- Severe pain that doesn’t improve
- Worsening swelling, heat, or spreading redness
- Persistent bleeding
- Symptoms of an allergic reaction (for example, widespread rash, breathing difficulty, facial swelling)
- Any other symptoms your prescriber told you to watch for
FAQ
How to give im b12 injection if I’m nervous or the person tenses up?
Focus first on relaxation: have the patient sit comfortably, use consistent landmarking, and plan the injection when they’re calm. In my experience, tension increases pain more than technique alone. If anxiety is severe, ask a clinician to observe your first attempts.
Can I switch injection sites (like deltoid vs thigh) for B12?
Sometimes clinicians allow site rotation between approved areas, but it depends on your prescription and your training. Use only the sites your prescriber instructed. If you’re unsure, confirm before changing.
What should I do if I accidentally miss the exact spot or feel sharp pain?
Stop the injection if the patient experiences significant unexpected pain. Do not “push through” discomfort. If you’re unsure about what happened or if the pain persists or worsens, contact your clinician for guidance.
Conclusion: Make Your Next Injection Routine and Safer
Learning how to give IM B12 injection at home is less about memorizing a few motions and more about setting yourself up for reliable technique: correct site selection, careful skin prep, smooth needle insertion, steady medication administration, and post-injection monitoring. Those details are where real outcomes improve—and where I’ve seen patients feel more confident after a few guided sessions.
Next step: If you haven’t already, ask your clinician for a live “teach-back” demonstration using your exact B12 product and the injection site they prescribed, then practice with the full checklist (supplies, landmarks, prep, injection, disposal, and documentation) before your next scheduled dose.
Discussion