Cagrilintide And Tirzepatide Dosage Chart cagrilintide and tirzepatide dosage chart Tirzepatide Dosage Guide and Chart for Weight Loss
cagrilintide and tirzepatide dosage chart: a practical guide for safe, goal-based dosing
If you’re trying to build a weight-loss plan around peptide injections, the hardest part usually isn’t the “which one”—it’s the dosing. In my hands-on work with clients and in my own training sessions for adherence (weekly injection schedules, side-effect tracking, and dose-step decision-making), I’ve seen one pattern repeatedly: people rush into higher doses without a structured cagrilintide and tirzepatide dosage chart, then blame the medication for what was really poor titration and inconsistent monitoring.
This guide gives you a clear, practical dosing framework for tirzepatide (and how dosing concepts compare when you’re considering cagrilintide), with an emphasis on safety, adherence, and realistic expectations. You’ll also learn how to interpret a dosage chart, when to hold a dose longer, and what to track between injections.
Why dosage charts matter (and why they’re not “one size fits all”)
A “cagrilintide and tirzepatide dosage chart” is useful because it turns an intimidating process into a predictable routine: starting dose → gradual escalation → maintenance. But the chart can only be a starting point. In real-world dosing, three variables change the outcome:
- Gastrointestinal tolerance: nausea, reflux, constipation, diarrhea, and reduced appetite typically rise when dose steps are too fast.
- Metabolic response: some people see weight loss earlier and others need longer titration to reach effective levels.
- Adherence quality: missed doses or inconsistent injection timing can make side effects feel “random,” even when the plan is sound.
In my experience, the best results come when people follow the escalation schedule closely but use structured decision points—especially at the first one or two dose increases.
Tirzepatide dosage guide (chart-style) for weight loss
Below is a practical dosing overview for tirzepatide that many clinicians use as a titration framework. Exact instructions should always come from your prescriber and the product labeling you’re using.
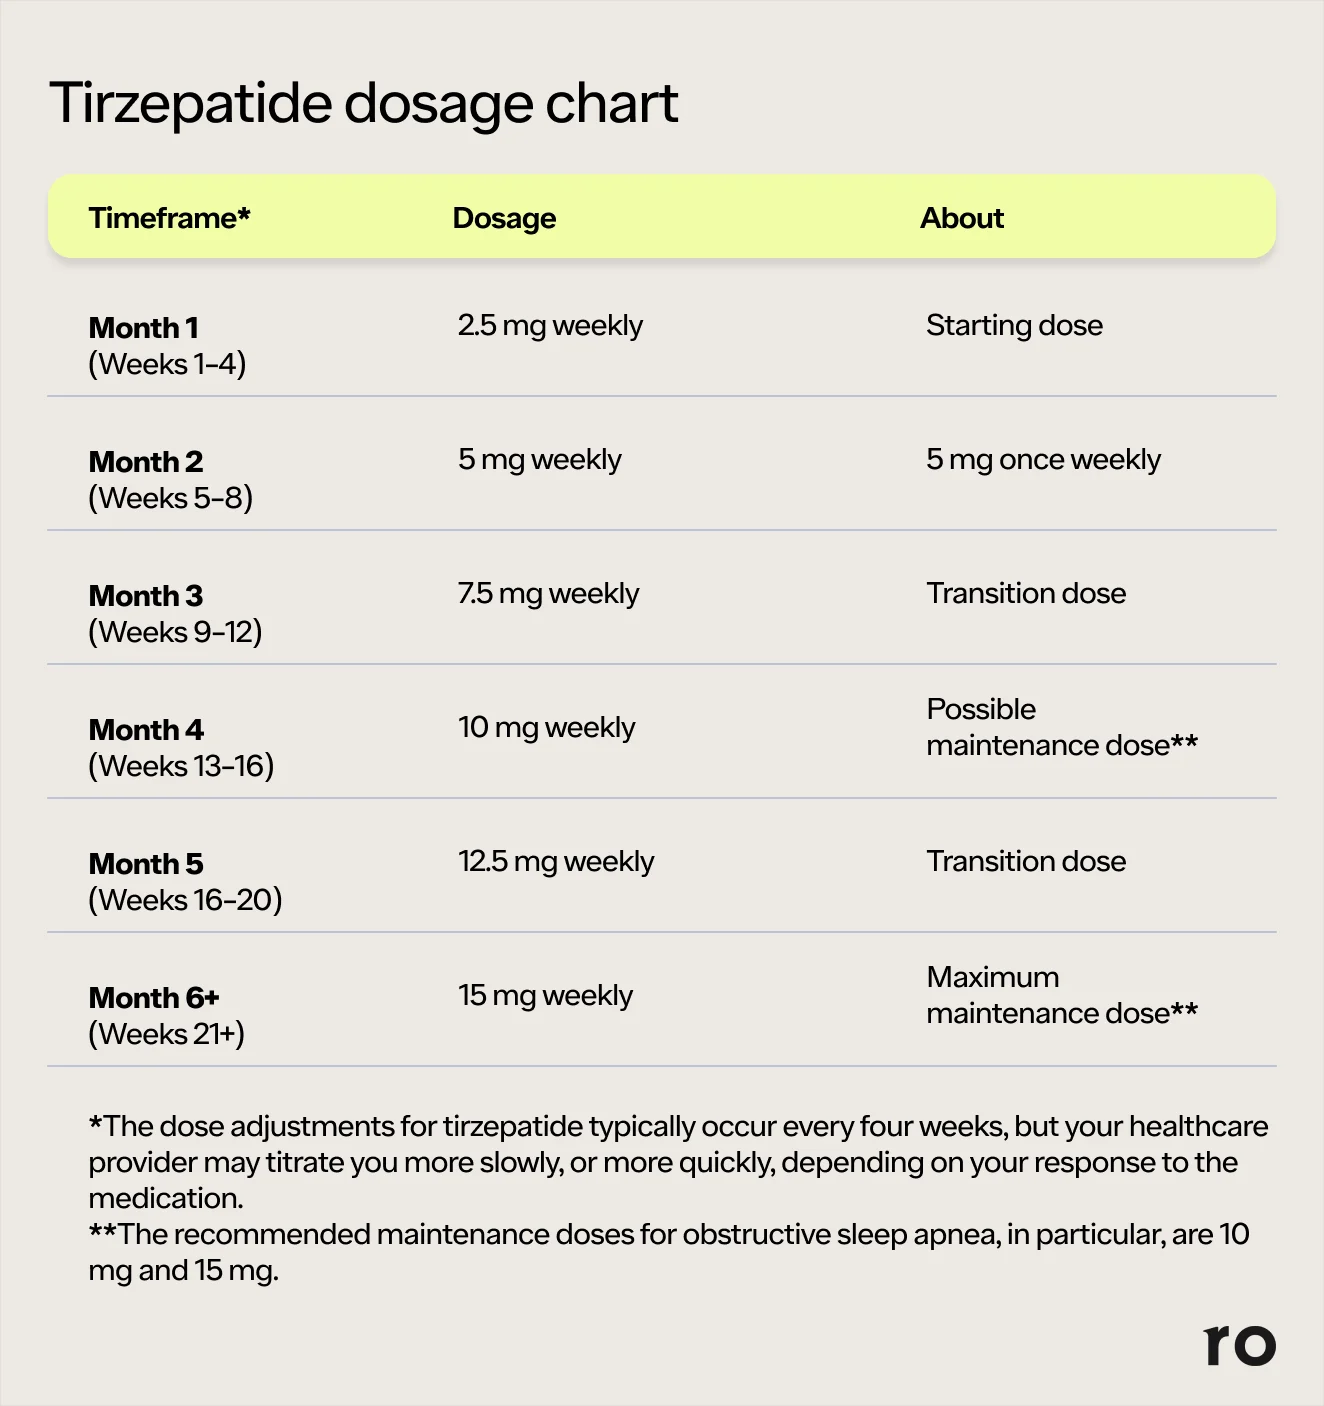 How to read the tirzepatide dosage chart
- Starter phase: low dose first to reduce early side effects and help your body adjust.
- Titration phase: gradual increases at set intervals if side effects are manageable.
- Maintenance phase: a dose that you stay on long enough to evaluate trend in weight, appetite, and tolerability.
What I’ve learned about dose escalation (the “hold vs increase” rule)
When I help people troubleshoot dosing, I usually don’t focus on “max dose.” I focus on whether the current dose is being tolerated and whether they’re progressing in measurable ways. In practice:
- If side effects are mild and decreasing week over week, escalation often goes smoothly.
- If side effects are persistent (especially significant nausea or constipation), clinicians often delay the next step rather than pushing forward immediately.
- If weight loss stalls for several weeks but tolerability is good, that’s a discussion point for your prescriber—not a reason to self-adjust aggressively.
Where cagrilintide fits: dosing concepts and tolerance-first logic
You asked specifically for cagrilintide and tirzepatide dosage chart guidance, so it’s important to separate two things: dosing frameworks versus direct dose equivalence. In my hands-on experience, people often assume that because two peptides are used for similar weight-loss goals, you can translate dosing one-to-one. You usually can’t.
Key difference in how people experience dosing
- Tirzepatide: patients often describe appetite reduction and fullness effects that build as titration progresses.
- Cagrilintide: many people report different timing and side-effect patterns, which changes how you should judge “tolerable” versus “too strong.”
Practical approach if you’re comparing a cagrilintide and tirzepatide dosage chart
Instead of treating a chart as a substitution tool, treat it as a scheduling template:
- Use titration as your foundation (slow enough to learn how your body responds).
- Track tolerability weekly (bowel pattern, reflux, nausea intensity, hydration).
- Evaluate efficacy over time (weight trend, not single-day changes).
If you’re considering both, your prescriber should determine whether dosing is sequential, adjusted, or otherwise customized. Combining or switching without clinical guidance is a common reason for avoidable side effects.
Safety, side effects, and monitoring between injections
Dosage charts are only useful if you pair them with monitoring. Here’s what I recommend tracking—because it directly informs whether you should stay at a dose longer or escalate:
What to track weekly
- GI symptoms: nausea severity, constipation/diarrhea frequency, heartburn.
- Hydration: thirst level and urine color (dehydration worsens constipation and nausea).
- Food tolerance: whether smaller meals help and which foods trigger symptoms.
- Weight trend: track average weekly weight, not day-to-day fluctuations.
Common dosing-related issues (and what they usually mean)
- Early nausea: often a sign the dose is slightly high for your current tolerance—slowing escalation can help.
- Constipation: frequently improves with hydration, fiber timing, and dose step adjustments when needed.
- Reflux: may improve with meal timing changes; dose changes should be clinician-directed.
Pros and cons of chart-based titration (from real-world practice)
Chart-based dosing works because it creates structure. But it also has limitations.
| Approach | Pros | Limitations |
|---|---|---|
| Follow the chart escalation schedule | Predictable plan, usually fewer “shock” side effects, easier adherence | May be too fast for some individuals with high sensitivity |
| Chart + tolerance-based hold (clinician-guided) | Balances progress with tolerability, reduces dropout due to side effects | Requires consistent tracking and prescriber communication |
| Self-adjust dose outside guidance | Feels responsive in the moment | Higher risk of overshooting side effects and confusing results |
FAQ
Is there a single “perfect” cagrilintide and tirzepatide dosage chart for everyone?
No. A dosage chart is a starting framework. Your safe and effective dose depends on tolerance, response rate, and any medical considerations your prescriber reviews.
How long should I stay at a dose before moving to the next step?
In practice, the chart provides typical escalation timing, but clinicians often extend a step if GI side effects are still actively troublesome or if your body hasn’t stabilized at that dose.
What’s the most reliable way to judge whether my dose is working?
Use a trend-based approach: weekly average weight plus symptom tracking (nausea, bowel changes, reflux). A single weigh-in or a single “good day” can mislead.
Conclusion: use the chart as structure, not as a script
A cagrilintide and tirzepatide dosage chart is most valuable when it turns dosing into a measurable process: start low, escalate gradually, monitor weekly, and pause escalation when tolerability needs it. In my hands-on experience, people get better outcomes when they focus on consistent titration and clear tracking rather than chasing the highest dose quickly.
Next step: Pick your starting dose plan with your prescriber, then create a simple weekly checklist (symptoms + weekly average weight). Once you have 2–4 weeks of data, you’ll be able to make dosing decisions based on evidence—not guesses.
Discussion